This is the first fitting garment.
There are a lot of wrinkles and the side seam isn’t falling straight but this is on the dressform. I will wait until my friend - we’ll call her MF for ease of writing - has tried it on to plan the necessary fitting adjustments. MF has a slightly scooped out lower back. I did a sway back adjustment by lowering the back waistline .5” and bowing the legs of the darts. The godet was so much fun to sew. I want to make sure it doesn’t get tangled up between her legs, inside the skirt, when she walks. The drape of my fashion fabric will ensure my godet falls properly. In my test garment, the godet has a tendency to lay flat :(.
Showing posts with label fitting. Show all posts
Thursday, April 14, 2011
Friday, December 3, 2010
Greaser Jeans: The Last Muslin
Here is the fifth muslin for my greaser jeans. It appears I have resolved the baggy crotch. All I had to do was decrease the back crotch extention. The point that sticks out on the back piece - take it in a bit, following the crotch line, and then taper and blend into the existing in-seam. Make sense?
Now I would love to make these up right away. But the holidays are approaching and I have a few christmas gifts I need to sew first.
Thursday, December 2, 2010
Greaser Jeans?
After reviewing the pictures of my greaser jeans muslins it appears I am going in the wrong direction. My second muslin, is by far, the best one. I made a fourth muslin and it was HORRIBLE. I didn't even take pictures. Sooooo, from the second muslin, I will be decreasing the back crotch extension. Hopefully, this will pull-in the front crotch.
Also, WildGinger software is on sale for the holidays. That includes the PatternMaster Boutique program I'm using.
Tuesday, November 30, 2010
GRRRRRreaser Jeans: Third muslin - *sigh*
Pants are HARD!!! Here are the first and second muslins. For the third muslin, I decided to add .5" to the back crotch extension. And I changed the shape of the front crotch to something flatter and less roomy. Here is what I got.
I omitted the back yoke because it has nothing to do with the fit. The back crotch fits better, however I still have a massive pouch on the front. So perhaps I should reduce the front crotch extension....I turned my pants inside out to expose the intersecting crotch seams. Then I made a small fold on the front side of the seam and pinned. I had to do this several times to get the fold the right size.
Finally...
I will measure the fold, multiply by 2, and that will be the crotch extension adjustment. I hope this is the last muslin.
Labels:
crotch length,
fitting,
jeans,
PatternMaster Boutique
Thursday, November 25, 2010
Greaser Jeans: The second muslin
Here are the greaser jeans, round two. You can see round one here.
I added ease in the crotch length and hips. I'm pretty happy with everything, except the crotch. The back crotch is a little tight but the front crotch is a little loose. I'm going to play with the crotch shape,break and extension settings in the Style Editor of PatternMaster Boutique4 and see if I can figure this out.
I also added a back yoke but it's purely esthetical. My lower back darts are 7" long so I transfered the dart to the center back seam and then cut off the yoke. I like how it breaks up the length, especially since these are waist length.
I omitted the pockets in this muslin. They were quite easy and they don't affect the fit.
And I tried my hand at flat felled seams. I've wanted to do flat felled seams for a long time but curved seams scared me. I figured a muslin would be a good place to practice. Turns out all you need is a tailor's ham. They are quite fun and look very neat from both sides.
Labels:
crotch length,
fitting,
jeans,
PatternMaster Boutique
Friday, November 19, 2010
New Project and Renovations
After fitting my pants sloper - which you can see here - I've decided to make myself some old school jeans. I'm going for something similar to what 
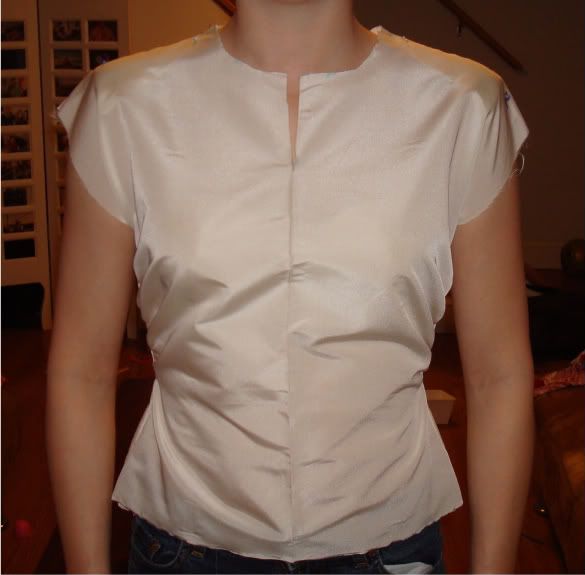
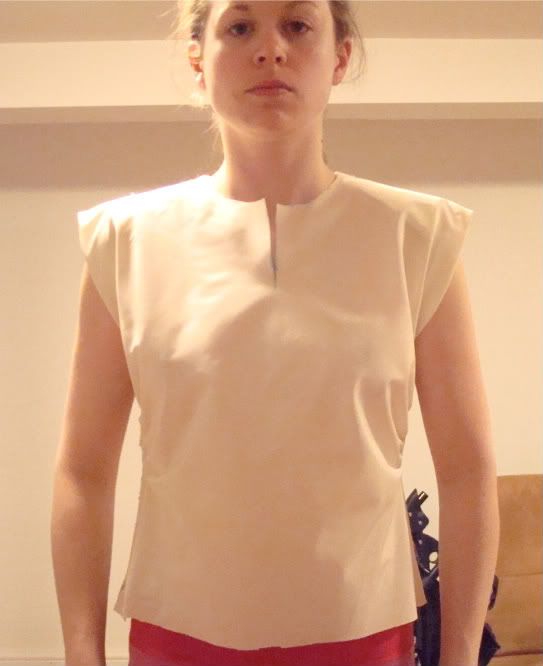
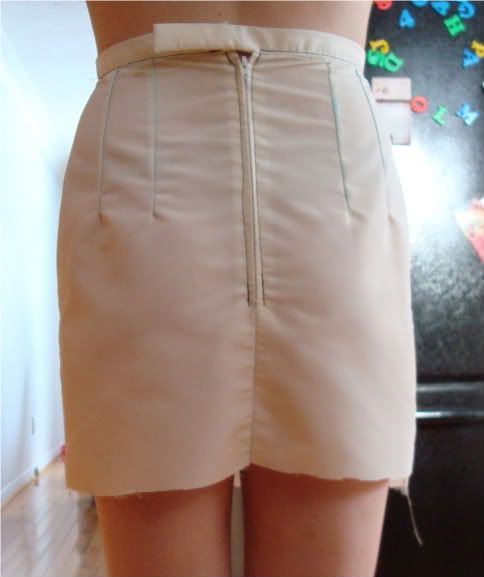
Freddies of Pinewood carries. Here is my first muslin. It's not bad.....for a stab in the dark!
They are tight. Like, "Tell me 'bout it, stud..." kinda tight. I will definitely need to add some ease in the crotch length, and then a tad more ease in the hips and waist.
And here is my new and improved closet. You can see my old closet here. I'm so glad this is done; it was really starting to eat me up inside. It took about 4 months to complete. I know! A freakin' closet! My husband and his father gutted the old closet, opened it up into the second closet, and then put up drywall. I taped, mudded, sanded and painted. Then I put up some closetmaid systems. I didn't buy the kit, I costumized it and just picked up what I needed. So for the first closet, I have shelving and a low rod for hanging pants and skirts.
And in the second closet I installed two rods, one above the other. It's a lot bigger than the picture suggests.
I love my new closet. I'm going to make a curtain to cover it. But it will be very heavy and hang straight and flat like a tapestry. Something with a big bold design.
Thursday, October 14, 2010
PatternMaster Boutique 4: Pants sloper III
My last sloper had too much crotch in the front. You can see here when I bend forward slightly....yuck!
Here it is with the excess pinned out. Now with the excess pinned out I remeasured my crotch length using the bottom of the waistband to locate my waist. Whooa! 25.5! That's a long way from the 28" I used in my first sloper. I remeasured the crotch length while wearing my first sloper and I got 27" because of all the extra fabric. Here is the third sloper with the new crotch length. Much better!
Labels:
crotch length,
fitting,
pants,
PatternMaster Boutique
Tuesday, October 5, 2010
PatternMaster Boutique4 : Pants sloper II
Well here is the second sloper for my pants. You can see the first sloper here. The crotch is better but I think I can still reduce the crotch length. Also, my butt looks like it's melting from the side. That's not a good look for me. I'm not sure how I will remedy that yet. It may take care of itself when I reduce the croth length further, or I may need to raise the hip depth one inch. We'll see!
Labels:
crotch length,
fitting,
pants,
PatternMaster Boutique
Monday, September 27, 2010
PatternMaster Boutique4: Pants sloper
Here is my first fitting for the PatternMaster Boutique4 pants. This is just the sloper. You can see my fitting for the dress sloper here.
Everything looks pretty good. The only thing that needs to be changed is the crotch length. I used an elastic to locate the waist and when I measured the crotch length I used the upper edge of the elastic which added an inch. It's hard to see in the pictures but the crotch of the pants is very low.
Labels:
crotch length,
fitting,
pants,
PatternMaster Boutique
Tuesday, June 1, 2010
Wing bust bodices and thrift stores
Wednesday, February 10, 2010
Hopefully the last muslin for Secretary001

Here are some pictures of the fourth muslin. I like the shoulders on this muslin but I prefer the fit of the lower portion on the third muslin. I'll just combine the two. I do find that the shirring on this muslin started too low on the side seam, so it's getting moved up and spread out more.
Finally I can make it up for real!
Wednesday, February 3, 2010
The Third Muslin for Secretary001

Here is the third muslin. This time I am trying to address the problem of the shoulder. I have lowered the armhole again because I don't want the shoulder overhang to be pulled down tightly.
You can see this has helped a little, but I'm still not getting the desired effect. My next muslin will be to increase the shoulder pad setting. That's a lot of muslins....
Labels:
blouse,
fitting,
PatternMaster Boutique,
shoulder pad
Friday, January 29, 2010
Secretary001, the second muslin...

So for the second muslin, I had to select 1 waist dart and then pivot the waist dart into the side dart to get the appropriate amount of shirring. Unfortunately, the improved fit caused the shoulder of the blouse to be pulled down.
So now that the fit and shirring has been figured out it's time to work on that shoulder line. I'll keep the fit the same, maybe play with ease a bit, and drop the armhole. It's time for a third muslin....
Labels:
blouse,
fitting,
PatternMaster Boutique,
shirring
Wednesday, January 27, 2010
A blouse named 'Secretary001'
Here is my next project, or the inspiration for my next project. I'm no expert on the matter but this reminds me of a 40's pencil pushing office blouse, which is why I named it Secretary001.

It looks to me like all the control has been shifted into side darts which were then gathered into the side seams. The sleeve looks like a very short kimono or dolman. Anyways, I got to work on the PatternMaster and this is my first muslin.

I'm not happy because I look like a bag lady!
So I learned that when zero waist darts are selected, the slack is not picked up anywhere else - not in the side seam and not in other darts. I'll have to manually shift all the control into the side dart. And that will be my second muslin....

I'm not happy because I look like a bag lady!
So I learned that when zero waist darts are selected, the slack is not picked up anywhere else - not in the side seam and not in other darts. I'll have to manually shift all the control into the side dart. And that will be my second muslin....
Thursday, December 10, 2009
Third time IS the charm!
I think I am ready to sew! Here is my third muslin. I checked my hip circumference and I could easily take off an inch. I used the Pattern Editor to transfer the control of one of the front darts to the side seam.
I know my muslins keep getting shorter and shorter, I'm just trying to conserve fabric.


I know my muslins keep getting shorter and shorter, I'm just trying to conserve fabric.


Labels:
fitting,
PatternMaster Boutique,
straight skirt
Second Straight Skirt Muslin
Well I got a whole bunch of feedback from the WildGinger people. I made my front darts shorter, and my back darts longer. I switched to just two darts and I lowered the hip line. Here is the second muslin,


I'm still getting a big pouch of fabric over my abdomen. And the skirt feels really loose in the hips. So what's next?... Well I have shifted the control of one of the front darts to the side seam. And I checked my hip circumference which turned out to be a bit smaller than what I had in the program. Third time is the charm...?


I'm still getting a big pouch of fabric over my abdomen. And the skirt feels really loose in the hips. So what's next?... Well I have shifted the control of one of the front darts to the side seam. And I checked my hip circumference which turned out to be a bit smaller than what I had in the program. Third time is the charm...?
Labels:
fitting,
PatternMaster Boutique,
straight skirt
Sunday, December 6, 2009
Straight Skirt Muslin
Here is my first garment in the making! I chose a simple, all-around staple, straight skirt with a back kick pleat. Here is the muslin-


I'm going to increase (almost double) the dart lengths and I will increase the hip depth as well. I'll be waiting to hear back from WildGinger support because they are always so wonderful. My time is dear to me; I'd hate to waste it. I already have the fabric picked out and it's beautiful; I can wait to sink my shears into it!


I'm going to increase (almost double) the dart lengths and I will increase the hip depth as well. I'll be waiting to hear back from WildGinger support because they are always so wonderful. My time is dear to me; I'd hate to waste it. I already have the fabric picked out and it's beautiful; I can wait to sink my shears into it!
Labels:
fitting,
PatternMaster Boutique,
straight skirt
Wednesday, November 25, 2009
WildGinger Pattern Master Fitting
So I recently purchased WildGinger's Pattern Master Boutique program. The program is very user friendly and is backed up by a tremendous amount of support - both online and over the phone. I find that you need a bit of experience in flat pattern drafting in order to achieve some of the more complicated styles of the 30's and 40's. My next purchase may be the Digital Flat Pattern Drafting book which should help me use the program more effectively. My sticky tape and scissors have been replaced by a monitor and mouse.
When you first begin using the program it's important to do a fitting. I took my measurements and my husband helped me. The user guide advises you not to agonize over the measurements and although I didn't agonize I was certainly careful and read the directions for measuring several times. I think it paid off.
I made my first muslin which felt alright. So I emailed pictures of my muslin to the WildGinger support group - within 24 hrs. they had gotten back to me and within 48 hrs they had sent me a list of suggestions, in the form of slight measurement adjustments. I made a second muslin, with the slight changes and it's perfect!
Here is my second muslin...

Now if I could only choose what to make first....
Subscribe to:
Posts (Atom)